You built your application and now looking for a way to deploy it with a managed security? You'd like to have a simple yet powerful enough solution that can extend later on? We have an example web server setup in this article that provides you that. At KelebekLabs, whenever we choose to go with a basic server setup, not PaaS or Kubernetes, we follow these principles.
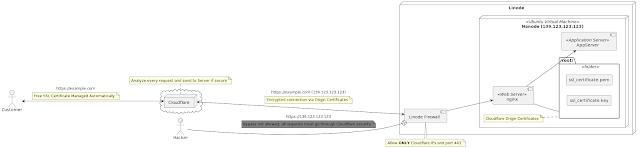
Cloudflare Application Security gives us a lot of services for free, such as DDoS protection, managing bad bots, rate limiting, free SSL certificate and many others. What we need to do is to make sure all the connections to our servers are going through Cloudflare and only. We're going to configure a firewall at our server provider side to make sure we only allow connection from Cloudflare so that the people who knows our IP address won't be able to bypass our security. You can think this as almost hiding your servers from the internet as Cloudflare will be the only door to your servers. In our example, we use Linode, a developer friendly, low cost cloud provider.
Instead of setting up the things manually at Linode, we're using Terraform, and to manage that we're using Terraform Cloud. In this article, you'll learn to set it up easily.
Preparing for Infrastructure as Code
We need a place where we're going to define our infrastructure, how many servers we have, what are their sizes, their connections in between etc. You can just create a new private repository on Github, or you can create a folder in your existing project. I prefer the second option as I like the monorepo more, so just create a readme file under terraform directory in your codebase.
Terraform Cloud
Terraform Cloud is an amazing service by HashiCorp with a free pricing option that helps you to ease your Terraform journey. It automatically connects to your repository, keeps the terraform state(the last state of your infrastructure, how many serves were created etc) for you, helps you to have your environment variables for you in their UI. Just
create an account (you can use login via GitHub if you click on Continue via HCP) and then create a workspace, which is basically your system.
Remember the option we talked about earlier, creating a folder in a repo, you can specify it while you're creating a workspace. Congratulations, you now have an automation, doing any changes under terraform directory will generate a new terraform plan.
Generating a Linode Token for Terraform Cloud
We need to give permission to Terraform Cloud to create servers for us on Linode. We're going to do that via personal API tokens.
WARNING: Terraform will create servers, make sure that you're aware of what's created and how much does it cost for you.
You can create an API token by going to API tokens page under My Profile.
Once you get the token, add this as an environment variable in our Workspace at Terraform Cloud. Great, now Terraform Cloud can do operations on Linode.
Cloudflare SSL
As mentioned at the beginning, Cloudflare protects our system from various problems. We're now going to focus on the connection between Cloudflare -- Linode. Cloudflare generates an SSL certificate that is called Origin Server (Linode is our Origin Server in this case) certificates that ensures the connection between Cloudflare and Linode is fully secure.
Assuming that your
DNS is already managed by Cloudflare, we can begin to make our configuration there. Create an Origin Server certificates by providing your domain name. The generated certificate will only be used between Cloudflare to Linode, real users won't be aware of it at all.
After creating the certificates, copy them as terraform variables in your Workspace variables pages at Terraform Cloud. Copy Private Key as SSL_CERTIFICATE_KEY and the other as SSL_CERTIFICATE.
Now you have all the necessary configuration ready, you'll be able to access these keys in your server and use them in your web server configuration.
Provision with Terraform
It's time for coding our infrastructure, you should put these IaC (Infrastruce as Code) files in your terraform folder. Once you commit them to your repository, you'll see a plan in your Terraform Cloud waiting for your approval. Once you approve your plan, Terraform is going to create an Ubuntu server for you with a simple init script, configure the firewall to only allow connections through Cloudflare and injects the SSL certificate keys as files.
Deploy your application
Now you have your server up and running, go to Linode console to access to your server via
Lish Console, it's a secure way to access to your server. Clone your application server and configure your nginx. There's an example nginx configuration attached as nginx.conf. This part is left out on purpose as the deployment can be different for everyone.
Configure your DNS with your server's IP address
This part is a bit hacky for my case, if I find a better option, I'll update the article.
So, since we have our Linode server up and running, get its IP Address and add this as an A record with Proxy on option on Cloudflare. Now you should be able to send a request to your server in a secure way.
Conclusion
We learnt how to programmatically provision our infrastructure with a basis of production grade security in a high level perspective. This gives us a peace of mind as we know we're protected from most of the basic attacks. Now we can learn more how to configure our Cloudflare better, how to improve our Application level security, go through
OWASP Top 10, organizational security principles etc. Building Secure applications is key for Reliability, Reliable applications boosts customers' and the developers' happiness. We'd like to be a part of this message by sharing our knowledge, so please reach out to us if you find any difficultly or anything wrong in this article.